


Flake epoxy garage flooring is a built system, not a paint with sprinkles. Its layers are decided before color is ever discussed.
Grind the slab, test its moisture, lay a thick epoxy base, and broadcast vinyl flake into the wet coat. Then seal everything under a clear topcoat.
Two decisions shape the result. How densely the flake is broadcast, and whether the slab passes its moisture test.
Costs quoted online fight with each other openly. This guide prints them by source and date, then explains the disagreement instead of hiding it.
This flooring guide sits inside EnglishHexa’s guides library, applying the site’s quote and cost habits to a trade where quotes vary wildly.
What a Flake Epoxy Floor Actually Is: The Layer Stack
| Layer | What it is | Typical build |
|---|---|---|
| Prepared concrete | Diamond ground surface profile | About CSP 3 |
| Vapor barrier primer | Moisture mitigation, when tests demand it | As specified |
| Epoxy basecoat | 100 percent solids, tinted | Around 16 mils in pro specs |
| Vinyl flake | Broadcast into the wet basecoat | Partial or to refusal |
| Clear topcoat | Polyaspartic or urethane | Finished system 20 to 40 mils |
Read the stack bottom up and the pricing makes sense. Every layer is labor, material, or insurance against a known failure.
The topcoat is not decoration. It carries the UV stability, the chemical resistance, and most of the wear the floor will ever see.
Compare that build with a paint kit’s few mils. The thickness gap is the honest summary of professional versus retail product classes.
Full Broadcast vs Partial Scatter: The First Decision
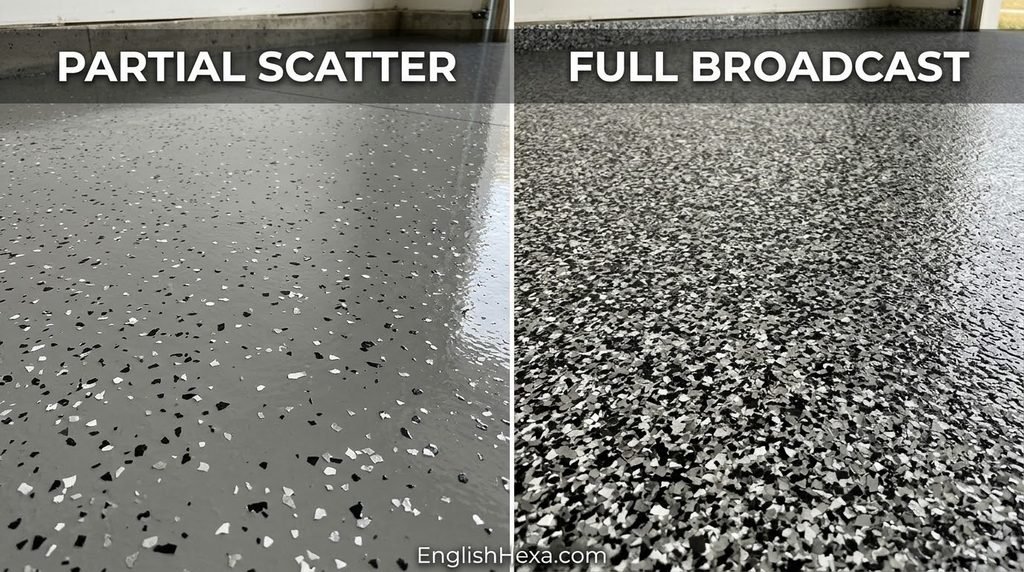
Full broadcast has a technical definition worth knowing. Flake is thrown into the wet basecoat until the resin accepts no more, called broadcasting to refusal.
The base color disappears completely under the chips. The floor reads as continuous stone, like granite or terrazzo, from across the room.
Partial scatter leaves the tinted base visible between flakes. It costs less, feels smoother underfoot, and shows dirt and wear sooner.
Quantity explains the price step. Full broadcast consumes roughly two to three times the flake, then adds a scrape and vacuum day to the schedule.
One cost guide prices that step precisely. Full broadcast runs about 1 to 2 dollars more per square foot than a partial job, per the March 2026 figures checked for this guide.
Working garages belong in full broadcast, finished spaces can scatter. The clearest statement of that rule comes from the Moreno Valley full flake explainer, which argues the split without flinching.
Flake Sizes and Color Blends: Picking the Surface
Flake size is a texture decision disguised as a style one. The residential standard is quarter inch, big enough to read as stone at standing height.
Eighth inch and sixteenth inch flakes read finer and feel smoother. They suit finished interiors, laundry rooms, and anyone who walks barefoot.
One inch flake goes the other way. The pattern turns bold and rustic, and the surface texture becomes impossible to ignore.
Blends are three to five colors mixed by the maker. Grays with black and white dominate because they hide the most life: dust, salt, and tire dust alike.
Choose blends under your own garage light. Showroom chips lie politely; your slab, your bulbs, and your door light tell the truth about tone.
What It Costs: Prices by Source, and Why They Disagree
| Source (date) | Flake epoxy figure | Two car garage |
|---|---|---|
| ShowFloor AI guide (March 2026) | $4 to $7 per sq ft installed | $1,800 to $3,150 full broadcast |
| HomeGuide survey (Feb 3, 2026) | Epoxy $4 to $10 per sq ft | $1,600 to $5,800 all systems |
| HomeGuide Houston guide (2026) | Decorative flake $4 to $7 | $1,500 to $3,500 flake |
| Bob Vila range (2026) | Epoxy $3 to $12 per sq ft | About $1,100 to $4,300 at 360 sq ft |
| Regional installer menus (2026) | $8 to $14 per sq ft | Priced per job locally |
The table is the lesson. Survey guides and installer menus do not describe the same job, and pretending otherwise is how budgets break.
Surveys average thin and thick systems, easy and ruined slabs, cheap and coastal labor. Menus price one company’s actual build, prep included.
The gap decomposes into four factors. Build thickness, topcoat class, prep scope, and region explain nearly every dollar of difference.
The most transparent national treatment found for this guide is the ShowFloor AI epoxy cost guide, which splits materials from labor line by line.
An installer publishing its own price beside the surveys is rarer and useful, and the Belcovo epoxy cost guide prints its flake line at 8.55 to 10.39 dollars per square foot, trip costs excluded.
Budget from the strand matching your job. A ground, full broadcast, polyaspartic topped floor should be budgeted from installer strands, not survey averages.
The Moisture Gate: Testing Before Anyone Quotes
Concrete breathes water vapor upward, always. Trap that vapor under an impermeable coating and it pushes back with bubbles, blisters, and peeling sheets.
Serious installers therefore test before quoting. The two standard instruments are the calcium chloride test, which weighs vapor emission, and in situ probes, which read slab humidity directly.
High readings do not cancel the job. They trigger a moisture vapor barrier primer, a mitigation layer priced into the quote as insurance.
In humid and coastal markets this gate is the whole business. Installers there describe skipped testing as the leading cause of floors peeling within a season.
Ask any bidder which test they run and what reading changes their plan. A shrug at that question is the loudest answer in the entire quote process.
Prep: Diamond Grinding, Repairs, and Honest Joints
Adhesion is mechanical, not hopeful. Diamond grinding cuts the slab’s sealed surface open to about a CSP 3 profile, giving resin something to grip.
Vacuum extraction rides along with the grinder. The dust stays out of your house, and the profile stays even across the slab.
Acid etching is the shortcut alternative, and its bond is weaker and patchier. Professionals grind; kits suggest etching; the lifespan tables record the difference.
Cracks get chased and filled, spalls get patched, and control joints get flexible filler. None of that makes joints disappear, and honest installers say so plainly.
A moving crack can telegraph back through any coating system. Budget for the floor to look excellent, not to perform structural miracles.
The Topcoat Decision: Polyaspartic, Urethane, or Bare Epoxy
Epoxy alone has one famous weakness. Sunlight ambers it, yellowing whites and blues along the garage door line within a few seasons.
Polyaspartic topcoats fix that and more. They are UV stable, cure fast, resist hot tires and chemicals, and return the floor to service within a day or two.
Urethane topcoats are the quieter alternative. Slightly slower and often satin, they wear well and cost a little less in some installers’ menus.
Bare epoxy with no topcoat is the false economy tier. It saves one line item and spends it later as gloss loss, staining, and early recoat.
If a quote omits the topcoat entirely, it is not cheaper. It is unfinished, and the comparison against finished quotes is rigged.
DIY vs Professional: The Honest Boundary
The installer internet says DIY always fails, which is not true. One installer page budgets the honest version itself, and this guide respects that candor.
Its math: a good 100 percent solids kit plus a rented grinder at about 100 dollars a day totals roughly 400 to 600 dollars all in for a smaller space.
The same source prices the expectation honestly too. That floor should serve 5 to 8 years, against a professional system’s longer design life.
The boundary is the space and the slab. Storage bays, sheds, and dry detached shops forgive; damp daily driver garages punish every shortcut in the system.
Choose DIY for the learning and the savings, with eyes open. Choose professional for moisture, scale, warranty, and a floor that must simply never fail.
Living With It: Cleaning, Wear, Repair, and the Topcoat Refresh
Daily care is almost insultingly simple. Sweep grit, mop with a pH neutral cleaner, and squeegee winter slush toward the door.
Grit is the enemy, not traffic. Sand under shoes is sandpaper, and it dulls any topcoat given enough winters of neglect.
Flake’s quiet superpower is repair. A damaged patch can be ground out, rebroadcast, and recoated so the pattern swallows the seam entirely.
Plan the refresh before you need it. Topcoats are sacrificial by design; a refresh in the back half of the floor’s life restores gloss and protection cheaply.
Lifespan claims deserve the strand treatment too. Cost guides print 10 to 15 years for flake systems; installer marketing stretches to 10 to 30, which is a span, not a promise.
Getting a Quote: The Questions That Reveal the Installer

Ask for the system in writing: basecoat solids and mils, broadcast density, topcoat chemistry. Vague quotes hide thin systems behind shiny adjectives.
Ask which moisture test was run and what it read. Ask whether the price includes grinding, crack repair, and joints, or whether those arrive as surprises.
Ask what the warranty actually covers: adhesion, peeling, workmanship, and for how long. A warranty against delamination with a test on file means something; a lifetime slogan does not.
The discipline transfers to any trade quote, and the website development quote cost guide applies the same line by line skepticism to a very different industry’s pricing.
Project sequencing matters as much as price, and the office move planning guide shows the planning habits that keep multi step projects from colliding with daily life.
For shop owners coating a workspace, cash timing is part of the spec, and the small business cash flow plan guide covers planning major expenses without starving the business between them.
Mistakes That Kill Floors
Most failed floors were doomed before the resin opened. Coating a damp slab without testing is the first and commonest fatal error.
Skipping the topcoat to save money is the second. The floor looks finished at handover and ages in dog years from that day forward.
Parking too early is the third. Hot tires on a young coating leave permanent prints that no cleaning chemistry can argue with.
Choosing by color sample alone is the fourth. The sample never mentions mils, solids, or prep, which are the floors actual specifications.
Rushing the season is the fifth. Coating into a cold snap or a condensing slab trades a free weekend for a failed cure.
Reading a Finished Floor Like an Inspector
Stand at the door and look across the light. A good full broadcast reads even and stony, with no base color windows and no roller tracks.
Crouch at the tire lanes. There should be no prints, no lifting edges, and no gloss difference between the lanes and the corners.
Check the joints with your eyes open. Filled, slightly visible joints are honest work; promised invisibility was never available at any price.
Run a hand along the stem wall line. Clean edges and coated verticals separate finishers from splashers more reliably than any brochure.
Photograph everything on day one. Your future warranty conversation, repair match, and resale listing will all thank that five minute habit.
Climate Notes: Same Floor, Different Enemies
In the humid South and on coasts, vapor is the standing threat. Testing and vapor primers move from optional to structural in those zip codes.
In the snow belt, the enemy arrives on tires. Salt and slush pool at the door line, so drainage habits and winter squeegeeing decide the apron’s lifespan.
In the desert Southwest, heat and sun run the test. UV stability and cure timing in hot slabs matter more than moisture ever will.
In freeze thaw country, the slab itself moves seasonally. Joint honesty and flexible fillers earn their fee when the floor survives January unchanged.
Tell your installer which enemy you hired them against. A quote that names your climate’s failure mode is a quote written by someone who has seen it.
The First Month on a New Floor
Week one is about restraint. Keep heavy point loads, dragging, and solvent spills off the young topcoat while it reaches full chemical cure.
Weeks two and three teach you the cleaning rhythm. A soft broom, a squeegee, and a bucket are the entire starter kit this floor asks for.
By the first month the floor should disappear from your thoughts. That ordinariness is the product working: the roughest room in the house simply stays presentable.
Note any change early and photograph it. Peeling, bubbles, or discoloration in month one are warranty conversations, and dates on photos are evidence.
What the Warranty Paper Should Actually Say
Read for the failure words: peeling, delamination, and loss of adhesion. Those are the failures that matter, and coverage should name them directly.
Look for conditions with numbers attached: the moisture test on file, the system installed, the exclusions listed. Vague lifetime language with no terms is decorative printing.
Ask who performs the warranty work and how a claim starts. A warranty you cannot invoke in one phone call is a brochure, not a contract.
Keep the quote, the test readings, and the warranty together in one folder. In year seven, that folder is the difference between a repair and an argument.
A Note on Numbers You Will Hear
Sales conversations love single figures: one price, one lifespan, one day. This guide prints ranges with sources because single figures are where honesty goes to die.
When a bidder gives you one number, ask which strand it belongs to. Survey average, their menu, or a neighbor’s job from 2021 are different species of fact.
Write the answer next to the number in your notes. Months later, when the floor is down and questions arise, provenance is the only memory that does not drift.
Keep the Folder, Keep the Floor
Every durable floor in this guide’s research shares one artifact: paperwork. Test readings, the written system, dated photos, and the warranty, filed together from day one.
That folder converts future problems into procedures. Repairs match, claims start, refresh coats spec themselves, and the floor’s second decade is planned instead of improvised.
Start the folder before the grinder arrives. It costs one envelope and pays out for as long as the floor itself lasts.
The Decision, Compressed
If your garage works for a living, buy full broadcast, a real topcoat, and a tested slab. If it hosts laundry and storage, a careful DIY or a partial system can be the right-sized answer.
Either way, decide on the build sheet, not the brochure. The floor under your tires for the next decade is being specified in that document, today.
One Walk-Through Before You Sign

Visit a finished floor by your finalist if you possibly can. Stand on the broadcast density you are buying and look at it in garage light, not showroom light.
Ask that owner one question: what would you change? Their answer, good or bad, is the most unbuyable research in the entire purchase.
Then sign, or walk, with a clear head. Floors chosen this way rarely generate the stories that fill review sites at midnight.
Floors Age From the Top Down
Remember which layer meets the world. The topcoat takes the sun, the salt, the tires, and the chemicals, and it is replaceable by design.
That single fact reframes maintenance from anxiety into scheduling. Protect the topcoat with habits, refresh it on time, and the system beneath never gets its turn at aging.
Judge every product claim you hear against that stack. Anything protecting the top layer is real value; anything below it is already handled.
Start at the Slab
Every section of this guide returns to the concrete. It is the only layer you cannot replace, and the only one whose condition was decided years before your project.
Test it, grind it, repair it honestly, and the resin above it becomes almost boringly reliable. Skip it, and no chemistry at any price saves the floor.
That is the entire discipline, and it fits on an index card. The rest of this page is commentary, evidence, and other people’s expensive lessons.
Bring the Questions, Keep the Receipts
Walk into quote meetings with this guide’s questions printed. The installers worth hiring recognize them and answer faster, not slower, for being asked properly.
File every answer with the bid it came from. When the floors are down and the years start passing, that paper trail is your maintenance manual and your leverage.
The Garage Deserves a Finished Floor
For decades the garage was the one room finished last and thought about least. Flake systems changed that because they made the roughest square footage in the house genuinely pleasant.
That change is the real product being sold at every price in this guide. Buy the build that protects it longest, and the room pays you back daily.
Decide Once, Properly
Flooring decisions punish haste and reward sequence: slab first, system second, color last. Follow that order and most of this category’s horror stories become structurally impossible in your garage.
The quotes are on your counter. Test the slab, spec the build, and let the color chips be the easy part they were meant to be.
Evidence Ages Better Than Enthusiasm
Showroom excitement fades by the first winter. What remains is the build sheet, the test result, and a floor that either keeps its promises or does not.
Choose the installer whose paperwork you would trust in year seven. That standard, applied once, outperforms every discount negotiated in the sales meeting.
Your Slab Is Talking
Stains, cracks, damp corners, and old paint are not blemishes to hide from the bidder. They are the diagnostic record your floor’s success will be written from.
Show the installer everything, including the embarrassing corner. Floors fail at the places nobody mentioned in the sales visit, almost without exception.
Ready When the Grinder Is
Everything in this guide converges on one morning: test results in hand, system in writing, color chosen under your own light. From that morning, the work is execution, not decision.
Book it, clear the garage, and let the layers go down in order. The floor that results will explain itself every single day it serves you.
One Last Number to Remember
When every quote blurs together, remember the build comparison: tens of mils for a professional system, a few mils for a paint kit. Thickness is the shorthand for everything else in this guide.
Ask for it in writing from every bidder. The one who answers with a number has a system; the one who answers with an adjective has a sales pitch.
Go Look at Your Slab
Close this page and stand in your garage. Note the cracks, the damp corner, the old stains, and the light at the door, because those observations are your project’s true beginning.
Bring that list to the quote meetings. It will do more for your floor than any color chip in the catalog.
Measure Twice, Coat Once
Garage projects forgive almost any delay except the delay spent deciding without data. Get the test, the build sheet, and the strand matched budget, and the rest of the project becomes refreshingly mechanical.
Take the Build Sheet Home
One page should leave every quote meeting with you: layers, mils, broadcast density, test result, topcoat, warranty terms. If it cannot fit on one page, the quote is hiding its shape on purpose.
Pin that page inside a cabinet door in the garage itself. Years from now it will still be the fastest and clearest answer to every question the floor ever raises.
Frequently Asked Questions
1. What is flake epoxy garage flooring?
A built coating system for concrete. A thick epoxy basecoat is broadcast with decorative vinyl flake, scraped after curing, and sealed under a clear topcoat.
The result is a seamless, textured, stone look floor, usually in a garage.
2. How much does a flake epoxy garage floor cost?
By source, roughly 4 to 14 dollars per square foot. Survey guides put flake systems at 4 to 7 dollars installed; installer menus with thick builds and polyaspartic topcoats print 8 to 14.
Your slab and spec decide.
3. What does full broadcast mean in epoxy flooring?
Flake thrown until the resin refuses more. The installer broadcasts chips continuously into the wet basecoat until no bare base color remains.
It uses two to three times the flake of a scatter and adds a scrape day.
4. Is full broadcast better than partial flake?
For working garages, usually yes. Full broadcast hides dirt, damage, and repairs better, grips more, and costs about 1 to 2 dollars more per square foot (March 2026 cost guide).
Partial scatter suits finished, lighter use spaces.
5. How many pounds of flake are needed per square foot?
Plan on pounds, not sprinkles. Full broadcast consumes several times a light scatter; installers order flake by coverage rates for the chosen density.
Ask your bidder for their pounds per square foot figure in the written quote.
6. How long does a flake epoxy garage floor last?
Cost guides say 10 to 15 years. Installer marketing claims stretch to 15, 20, even 30 years, which are spans, not medians.
A midlife topcoat refresh is what keeps a system looking right in its second decade.
7. How long before I can park on a new epoxy flake floor?
Days, per the installer’s cure schedule. Fast polyaspartic systems return to foot traffic quickly and vehicles within about one to two days per installer guidance.
Follow your system’s written times; tire heat plus early parking is the classic mistake.
8. Is a flake epoxy floor slippery?
Less than smooth coatings, not a guarantee. Full broadcast texture grips well and is sold partly on that traction.
Wet, sloped, or pool adjacent floors still deserve an anti slip additive conversation with the installer.
9. Does epoxy flake flooring yellow in sunlight?
Epoxy alone does; the system should not. Bare epoxy ambers in sunlight.
A UV stable polyaspartic or urethane topcoat is the standard fix, which is why finished quotes include one and cheap quotes quietly omit it.
10. What is a polyaspartic topcoat and do I need one?
The UV stable clear coat over the flake. Polyaspartic topcoats add sun stability, chemical and hot tire resistance, and fast return to service.
On a garage floor that sees daylight and cars, treat it as required, not optional.
11. Can flake epoxy be installed over cracked concrete?
Yes, after the cracks are repaired, not hidden. Installers chase and fill cracks and patch spalls before coating.
Honest warning: moving cracks can telegraph back through any coating, so repair improves odds without promising invisibility.
12. Can flake epoxy go over an old peeling coating?
No, removal comes first. New resin bonds to concrete, not to a failing paint layer.
Old coatings are ground off during prep; coating over a peeling floor simply inherits the peeling, usually within the first year.
13. Why does concrete need a moisture test before epoxy?
Because vapor is the leading failure cause. Moisture rising through the slab gets trapped under the coating and pushes it off as bubbles and sheets.
Testing (calcium chloride or in situ humidity) tells the installer whether mitigation is needed.
14. What happens if the slab is too wet for epoxy?
A vapor barrier primer goes down first. Moisture mitigating primers are designed for higher emission slabs and are priced into the quote.
In the worst cases an installer may decline or resequence the job until the slab dries.
15. Is diamond grinding better than acid etching?
Grinding, decisively. Diamond grinding cuts a uniform CSP profile for mechanical adhesion and removes old coatings and contaminants.
Acid etching is uneven and weaker; the lifespan gap between pro and kit floors starts exactly here.
16. What flake size should I choose, 1/4 or 1/8 inch?
Quarter inch for most garages. It reads as stone and hides the most.
Eighth and sixteenth inch read finer and feel smoother for finished interiors and bare feet.
One inch is a bold, rustic texture statement.
17. Does flake epoxy hide concrete imperfections?
Better than any smooth floor can. The multicolor pattern camouflages patches, stains, and minor cracks, which is a core reason flake outsells solid colors in garages.
Deep structural damage still needs repair first; camouflage is not structure.
18. Can a flake epoxy floor be spot repaired?
Yes, and this is flake’s party trick. A damaged area can be ground out, rebroadcast with matching blend, and recoated; the busy pattern swallows the repair seam.
Solid color floors show patches; flake floors mostly do not.
19. How do you clean a flake epoxy garage floor?
Sweep, then mop with pH neutral cleaner. Grit is sandpaper and does the real damage, so regular sweeping matters more than products.
Harsh chemicals and vinegar mixes can dull topcoats; warm water and neutral cleaner are the standing advice.
20. Will hot tires damage an epoxy flake floor?
Not a properly specified system. Hot tire pickup plagues thin, water based kits parked on too early.
High solids bases under polyaspartic topcoats are sold as hot tire resistant, provided cure times are respected.
21. Will road salt damage a flake epoxy floor?
It is a design case, not an afterthought. Quality topcoats resist deicing salts; the maintenance side is yours: squeegee slush out rather than letting brine ponds sit, and rinse the drip zone at the door through winter.
22. Can I DIY a flake epoxy garage floor?
Yes, inside honest limits. A 100 percent solids kit plus a rented grinder can total roughly 400 to 600 dollars for a smaller, dry space, with 5 to 8 years of expected life per one installer’s own accounting.
23. How long does installation take?
Typically one to two days professionally. Grinding, repairs, basecoat and broadcast, scrape, then topcoat, with fast cure systems compressing the schedule.
Cure to parking adds its own window on top of the installation days.
24. Does the flake floor need a topcoat refresh later?
Plan on one in the back half of its life. The topcoat is the sacrificial wear layer by design.
Refreshing it restores gloss, traction, and chemical resistance for a fraction of the original system cost.
25. Will control joints show through a flake floor?
They can, and honesty matters here. Control joints move by design, and coatings bridge them imperfectly.
Flexible joint fillers reduce the line; no installer can truthfully promise a joint will never ghost through.
26. What temperature does epoxy need to cure properly?
Within the product’s stated window. Epoxy cure chemistry is temperature and humidity sensitive; installers watch the dew point as well as the thermometer.
Cold slabs and condensing conditions are the classic causes of cure failures and blushing.
27. Is flake epoxy good for a home gym or workshop?
Yes, both are core flake territory. Texture helps with dropped tools and shop fluids, and the pattern hides workshop life.
For gyms, mats belong under heavy drop zones; resinous floors are tough, not invincible.
28. How thick is a professional flake epoxy floor?
Tens of mils, not single digits. Professional flake builds are described at 20 to 40 mils total; one installer spec runs a 16 mil basecoat alone.
Big box paint kits cure at a few mils, which explains the lifespan gap.
29. What is the difference between flake epoxy and metallic epoxy?
Pattern and construction. Flake is a broadcast of pre made vinyl chips in set blends: uniform, repairable, stone like.
Metallic uses pigments swirled in the resin for one of a kind movement, glossier and harder to repair invisibly.
30. Flake epoxy vs polyaspartic flooring: which is better?
They are layers, not rivals, in most garages. The common professional build is an epoxy base with a polyaspartic topcoat.
Full polyaspartic systems cure faster; the hybrid balances build thickness, working time, and cost.
31. Does a flake floor increase home value?
As presentation, plausibly; as a statistic, unproven. A clean, finished garage photographs and shows better, and flake is the default finished look.
No verified dataset in this research ties a specific dollar premium to the floor alone.
32. What colors do epoxy flakes come in?
More than most buyers expect. Blends run through grays, blacks, tans, browns, blues, and mixed stone tones, in three to five color mixes.
Order physical samples; screen colors and showroom chips both flatter the truth.
33. Can flake epoxy be used in a basement or laundry room?
Yes, with the moisture gate respected. Basements and laundry rooms are natural flake spaces when the slab tests dry or gets a vapor primer.
Below grade moisture discipline matters even more than in a garage.
34. How is excess flake removed after broadcasting?
Scrape, then vacuum. After the basecoat cures, loose and upright flakes are scraped flat with floor scrapers, and the excess is vacuumed up, much of it reusable.
This step is the extra labor inside a full broadcast price.
35. What warranty should a flake epoxy floor have?
Adhesion, in writing, for years. Look for peeling and delamination coverage with prep and moisture testing documented, plus a workmanship term.
Slogan warranties without terms, tests, or paperwork are marketing, not protection.
36. Why is my epoxy floor peeling, and can flake fix it?
Almost always a prep or moisture failure underneath. Resin rarely fails; bonds do.
A flake system can be the rebuild after grinding the failed coating off and testing the slab, but coating over the failure repeats it.
37. Are epoxy fumes dangerous during installation?
Manageable with ventilation and respect. Uncured components are industrial chemicals: installers ventilate, wear respirators, and keep households out during application.
Once cured, the floor is inert.
Follow your installer’s re entry times exactly.
38. Can you put a car lift or jack stands on epoxy flake?
Generally yes, with common sense. Cured professional systems carry vehicle loads routinely.
Use pads under sharp jack stand feet to protect the topcoat, and treat a lift install as an installer conversation about point loads.
39. Does flake epoxy resist oil and chemical spills?
That is its home turf. Quality topcoats wipe clean of oil, gasoline, and brake fluid rather than soaking them up like bare concrete.
Prompt cleanup still matters; resistance is not an invitation to store spills.
40. What is the best season to install a flake epoxy floor?
Shoulder seasons help; prep matters more. Moderate temperatures ease cure management, which is why spring and fall books fill.
A good installer works year round by managing slab temperature and humidity instead of trusting the calendar.
41. How do I compare quotes for a flake epoxy floor?
Compare the build, not the bottom line. Line up basecoat solids and mils, broadcast density, topcoat chemistry, prep scope, moisture testing, and warranty terms.
The cheapest quote is usually a thinner system wearing the same name.
42. Is a flake epoxy floor worth the money?
For most garages, yes, at the right spec. It converts the roughest room in the house into finished, cleanable, repairable space for a decade plus.
Worth shrinks when quotes skip the topcoat or the moisture test to win on price.
Conclusion
Flake epoxy garage flooring rewards buyers who spec the system, not the color. Broadcast density, topcoat chemistry, and one moisture reading decide the decade ahead.
Prices will keep disagreeing across guides and menus. Read them by source and date, and the disagreement turns into information about what each quote includes.
The wider planning habits behind a project like this travel well, and the office move planning guide shows how sequenced projects stay calm, whatever the trade involved.
Get the moisture test, get the build in writing, and get the topcoat. A floor chosen on those three lines rarely needs a second decision.
Walk your slab with the questions in this guide and request the written system. The floor you approve on paper is the floor that shows up.

Dilawar Mughal is an SEO expert with 8 years of hands-on experience helping websites grow their organic traffic, rankings, and revenue. He specializes in content-driven SEO, local SEO, and Pinterest SEO, and builds practical, results-focused strategies for businesses and publishers.

1 thought on “Flake Epoxy Garage Flooring: The System, the Cost, and the Prep That Decides It”